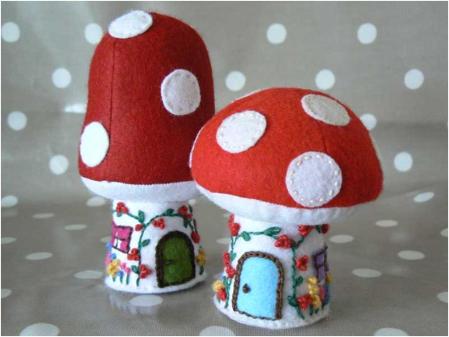
Toadstool Cottage (left) and Mushroom House (right)
Now, I know that craft blogs are full of mushroom pincushions, but when I decided I had to have a mushroom pincushion of my very own, I couldn’t find a pattern or tutorial for the shapes I had in mind. Not that the ones I found weren’t lovely, just that I had a very specific image in my head of how I wanted my pincushions to look.
Failing to find a pattern on the internet, I again had to resort to making my own pattern, this time using a compass, a protractor, a ruler, and my rusty knowledge of geometry. Now, either my knowledge of geometry was much better than I thought, or I was incredibly lucky, because the pattern worked.
If you want to make your own, here’s how.
First, get a compass, protractor and ruler…. Only kidding.
You’ll need the following materials:
Red & white felt: a 9″ (23 cm) square of each will be big enough to make Toadstool Cottage and Mushroom Cottage unless you enlarge the pattern. Or, you can use any other colours you like.
Embroidery floss or wool:
- White, for attaching the spots (you could use normal sewing thread for this instead)
- Green, for grass and stems
- Brown, for the door and windows
- Selection of colours for the flowers. I used red, pink, blue and yellow
Scraps of coloured felt (or other fabric) for doors and windows
Sewing thread, embroidery needle, etc
Stuffing: I used toy stuffing for mine as I wanted them to be washable, but you could also use pellets or rice, or even wood shavings as stuffing.
Directions
Download the pattern file
Click here for the pattern. That link will take you to a PDF of the pattern pieces. If you print the document at 100% of its size your Toadstool Cottage will be approximately 5″ or 13 cm high, and Mushroom House will be approximately 4″ or 10 cm high. (Unless I really messed up the production of the file, in which case let me know…)
You can enlarge or reduce the pattern to make different sizes.
Please note: this free pattern download is not for resale. All rights reserved. No part of the pattern may be reproduced in any form. The written instructions, photographs, design, and pattern are intended for personal, non-commercial use only i.e. you are not permitted to sell any items made using this pattern.
Cut out the following pieces
From red felt
- Either 4 x cap top 1 for Toadstool Cottage or 4 x cap top 2 for Mushroom Cottage
From white felt
- Either 1 x cap bottom 1 for Toadstool cottage or 1 x cap bottom 2 for Mushroom Cottage
- 1 x stalk
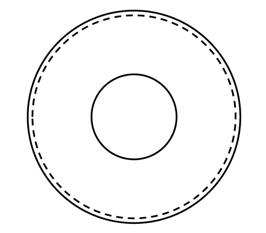
- 1 x base
- 8 or 9 spots (I used 9 spots for Toadstool Cottage and 8 spots for Mushroom House)
From felt colour for door
- 1 x door
From felt colour for windows
- 4 x curtains
Make the cap
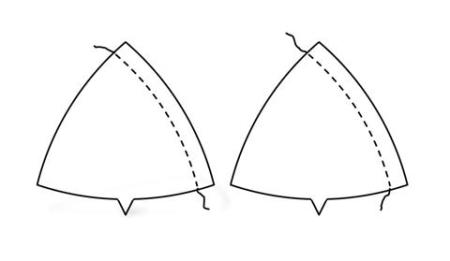
Step 1: take two red cap top pieces and pin together. For Toadstool Cottage, sew down one of the long sides, using a ¼” seam. For Mushroom House, sew down one of the sides without the notch, as shown below, using a ¼” seam. Repeat for the other two red cap pieces.
Step 2: open both the sewn pieces out flat, and pin to each other, matching the corners and seams. Sew together, using a ¼” seam.

Step 3: turn right side out, and sew the white spots to the cap using running stitch. If you prefer, you can attach the spots using fabric glue. I used nine spots for Toadstool Cottage, and eight spots for Mushroom House.

TIP: it is easier to sew the spots to the cap before the cap is stuffed, but if you prefer, you can sew them on later.
Step 4: turn the cap inside out again, and baste the cap bottom to the edge. Sew using as small a seam allowance as possible, a maximum of a ¼” seam (I used an 1/8″ seam, but both work).
Turn the cap right side out again, taking care not to stretch the cap bottom.
Make the base
Step 1: place the door in position on the stalk piece and baste into place. Note: the base of the door should sit about ¼” above the bottom of the stalk, as shown below. Sew the door in position using chain or back-stitch, and make a French knot for the door handle. Then baste the curtains in position, and embroider the window frames, again using chain stitch or back-stitch.

Step 2: embroider the stalk with any details you like, leaving a margin of ¼” round the edge of the stalk piece. As you can see, I embroidered lots of flowers, because that’s what I wish the front of my house looked like. I used a combination of detached chain stitches, back stitch, and French knots for my embroidery.


Step 3: once you have finished decorating the stalk, fold it in half with the embroidery on the inside, and the two short sides matching up, and sew using a ¼” seam, then turn the right way out.

Join the cap and base together
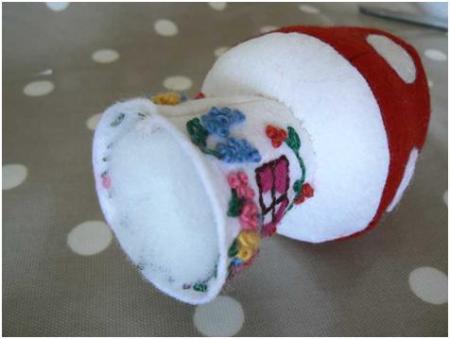
Step 1: lightly stuff the cap. Don’t stuff it too much, as you need to be able to insert the stalk into the opening.
Step 2: insert the stalk into the opening, and baste into place.

Then sew firmly using ladder stitch.
Step 3: once the stalk is attached, finish stuffing the cap firmly. Then stuff the stalk, but loosely. You shouldn’t have any stuffing poking out of the bottom when you’ve finished, or the pin cushion won’t stand up (check that it stands up before you attach the base, and adjust the stuffing if needed).
TIP: if you’re using pellets or rice or something similar for stuffing, it maybe useful to cut a circle of card or plastic to line the base with.
Step 4: attach the base using running stitch.

And ta daaaaa! You’re done.

If you make any of these, please post a pic to The Little House by the Sea flickr pool or send me a pic, as I’d love to see them.

November 4, 2008 at 8:41 am |
oh my god – those are SO cute!!!!!
November 16, 2008 at 8:13 pm |
LOvE LovE LoVe them.
November 18, 2008 at 7:23 am |
Danke für die Anleitung samt Vorlage !!!
Hoffe, dass ich sie annähernd so hübsch hinbekommen werde
Thank you for the pattern and the tutorial! They are lovley
Greetings
Bieba
November 25, 2008 at 1:56 pm |
so so so so so so so cute! I’ve been trying to figure out a little thing to make my sister for Christmas, and this is JUST the thing, especially since she sews. THANKS!
November 25, 2008 at 3:17 pm |
Oh, I can’t wait to make these! Thank you so much for the tutorial. I am going to try it with pellets in the bottom to help them stand.
November 25, 2008 at 4:48 pm |
seriously…this is just genious….i love it and have to make one soon…..my sister would go crazy for this……so, i won’t be able to post about it on my blog until i am finished…but then i will…….blog on sister….you are so creative….
November 25, 2008 at 7:43 pm |
Arrrgh! The cuteness!
November 25, 2008 at 10:18 pm |
how adorable! i love them – especially the pretty flowers 😀
November 25, 2008 at 11:04 pm |
Thank you so much for this. This is perfect to add to my Christmas present list.
November 26, 2008 at 12:01 am |
[…] have been a few over the past week that have grabbed my attention and this one from Little House by the Sea is going straight to the top of the list. Handily for me (or not) I ran out of the green thread I […]
November 26, 2008 at 2:33 am |
Oooohhhh! They’re lovely!!!! Thanks for the tutorial, I think it’s too difficult for me 😦 but I hope I’ll be able to do it one day! 😉
November 26, 2008 at 2:56 am |
so beautiful…really itching to drop what I’m doing and make some.
November 26, 2008 at 3:18 am |
Oh. My. Those are the cutest things I have ever seen! I don’t remotely need a pincushion, but I’m going to try one anyway just to set around the house. Thanks!
Susan
November 26, 2008 at 3:28 am |
These are amazing! My mother is a huge fan of all things red/white/toadstool. I don’t think I have time with the rest of my list to whip this up for her for Christmas, but this might just have to be her Mother’s Day gift this year! Thanks for the pattern!
November 26, 2008 at 3:58 am |
wow!! this is really really great! massive big up :X
i cant wait to try to build this, or something similar to this 😀
i accidentaly landed on your blog… me and my girlfriends have a dream (“our little house by the sea”) :)) and when we dream… it’s all happening there 😀
cheers :*
November 26, 2008 at 6:47 am |
WOW These are Fabulous. I will definately have a go at making these this week. Can I add you have a beautiful blog. Kind wishes Cele
November 26, 2008 at 6:54 am |
These are so darling! Thank you so much for sharing your creativity with all of us! You are very generous!
November 26, 2008 at 8:37 am |
These are adorable- And what a great tutorial also!
November 26, 2008 at 10:53 am |
Lovely !!! I ❤ mushrooms !!!
Thanks a lot for taking the time to make this tutorial and sharing it !!!
November 27, 2008 at 6:37 am |
Oh my ! Isn’t these so cute have to hurry make one fast so i can put it out for christmas.Thank you so much for the tutorial.
hugs ginger
November 27, 2008 at 9:52 am |
This is soooooooo sweet! I’ve scheduled a link to this post to go live on my blog mid-day Saturday (Central USA time), Nov. 29. I hope it brings you a few extra clicks.
Denise
http://needlework.craftgossip.com
November 27, 2008 at 10:35 am |
merci pour votre blog et le tuto
quel rêve vos réalisations, la petite Molly et “la petite maison près du lac”…
je vous souhaite beaucoup de bonheur
its a dream: the mushroom, Molly, and “the little house by the see”
good luck!!!!!
November 27, 2008 at 10:41 am |
Thank you so much, everyone, for all your kind words and compliments. I’m really touched.
November 27, 2008 at 7:07 pm |
Those are gorgeous! I’m obsessed with embroidering little felt houses at the moment. I might have to make a little mushroom to go next to them!
November 28, 2008 at 4:22 pm |
These are the cutest things that I have ever seen (except my daughter, of course)! You are so clever!
I plan to make a bunch of these to decorate our home this Christmas. I will post them to flickr when I’m done.
THANK YOU
November 30, 2008 at 7:38 am |
[…] Calypso of the little house by the sea blog is sharing the pattern and instructions for a project so sweet it made me sigh out loud. Don’t you need some of these mushroom houses to tuck among your holiday decorations? See the tutorial. […]
November 30, 2008 at 12:32 pm |
LOVE these. Thank you so much for the brilliant tutorial!
December 1, 2008 at 4:28 am |
These are totally cute little mushroom houses and I just love your directions to make them! They are perfectly clear!
December 2, 2008 at 5:51 pm |
I found this in a search for “fabric mushroom patterns” and an hour later I have a mushroom on the mantle. Granted, it’s not embellished with embroidery nor sewn on spots, but I made it from cotton and linen fabrics instead, cutting the center circle of the cap bottom a little smaller to allow for a little extra seam allowance.
Thank you so much for the pattern and instructions. I’ll post a picture sometime soon, linking here.
December 3, 2008 at 12:52 am |
I just loved it!!!
I think i’m gonna try… but… not sure I can make it!!!
Thank’s!
December 3, 2008 at 6:24 am |
Holy cow. That is just so cute it’s almost wrong.
December 7, 2008 at 2:17 pm |
[…] toadstool & mushroom houses is not only talented and wicked with felt and needle, but has posted the how-to so you can have these in your life. Impress your frog friends with their life-like detail. […]
December 9, 2008 at 10:39 pm |
[…] Don’t you just love, love, love anything gnome, elf, fairy, toadstool, and brussel […]
December 24, 2008 at 2:04 pm |
Impresionante. It like me very very much.
I have put a Link in a Spanish forum del that I am assiduous. I hope that it does not offend the idea to you. My more sincere congratulations because you work brilliant.
Kisses and HAPPY CHRISTMAS
Lo
December 29, 2008 at 11:32 pm |
thank you for this tutorial
December 30, 2008 at 9:12 am |
[…] pattern for this was from Little House by the Sea, who very kindly shared her pattern. The embroidery was mostly my own creation, although the […]
December 31, 2008 at 11:27 am |
[…] pattern for this was from Little House by the Sea, who very kindly shared her pattern. The embroidery was mostly my own creation, although the […]
January 5, 2009 at 8:17 pm |
[…] Child’s Tent, Boutique Nutmeg Designs for Sew, Mama, Sew Kimono Wrap*, Habitual Toadstool Cottage & Mushroom House*, The Little House by the Sea Growth Chart, Unraveled Five Stones: Japanese Bean Bags, Honey & […]
January 7, 2009 at 6:23 am |
thank you so much for the patterns I just love yours am planning on trying these today
January 8, 2009 at 12:15 am |
thank you so muh for this very good pattern!!!it’s sooo cute!

you can see the ones i made here:
April 9, 2022 at 4:54 am
Beautiful!!!
January 8, 2009 at 8:14 pm |
These are the cutest!! >v<
January 9, 2009 at 5:48 am |
oh my God, its very very nice this project, I love it, im form mexico, and i like so much your blog, congratulation, excusame , my english its very ugly, but im learning. congratulations again
January 11, 2009 at 4:54 pm |
This is wonderful! Thank you so much! I am going to make one for me nieces b-day tomorrow!
Many thanks:)
January 16, 2009 at 4:13 am |
Thanks for sharing your work with us! Your theme is just awesome!
January 16, 2009 at 10:11 am |
[…] Instructables Child’s Tent, Boutique Nutmeg Designs for Sew, Mama, Sew Kimono Wrap*, Habitual Toadstool Cottage & Mushroom House*, The Little House by the Sea Growth Chart, Unraveled Five Stones: Japanese Bean Bags, Honey & […]
January 16, 2009 at 11:09 pm |
[…] toadstool cottage and mushroom house […]
January 23, 2009 at 12:27 am |
[…] saw these pictured on this lovely blog, and the author was nice enough to post the pattern (which she created […]
January 23, 2009 at 7:18 pm |
These are SO cute! My 4 and 6 year old sons are fighting over who I will make one with a blue door for. Thanks for this tutorial, tomorrow will be a fun project day!
January 24, 2009 at 3:06 am |
hello, thought i’d say leave a comment seeing as i’ve dropped in on your blog. i travelled here via dottiecookie who posted photos of her lovely mushroom pincushion on her blog with the link to the pattern. i’m so glad she did as it’s just gorgeous and i’ve already bought felt so that i can make one too!
thank you for the pattern, i’m going to enjoy this project a lot!
January 28, 2009 at 1:08 pm |
[…] Find the free pattern and instructions here: Toadstool Cottage and Mushroom House by The Little House by the Sea […]
February 13, 2009 at 10:53 am |
Please stop by my blog to see the one I made from your wonderful pattern! Thanks for your generousity!
February 16, 2009 at 12:37 am |
Hello, I can’t understand how to add your blog ( thelittlehousebythesea.wordpress.com ) in my rss reader
March 4, 2009 at 4:43 am |
[…] Don’t you just love, love, love anything gnome, elf, fairy, toadstool, and brussel […]
March 5, 2009 at 10:15 am |
o wow, thanks so much for this wonderful tutorial. I will have to have a go as I’ve been wanting to make a toadstool pincushion for ages. Thank you! :oD
March 6, 2009 at 8:07 am |
Gute Arbeit hier! Gute Inhalte.
March 7, 2009 at 11:55 pm |
These are really cute, as you know cos of the gazoolian responses you have had! I will have to make sure I get time to make some of these. Thank you.
March 17, 2009 at 12:16 am |
Deary me, these are just sooooo cute!!
I love it!!
Thanks a thousand time for sharing!
March 22, 2009 at 3:55 am |
THANK
March 30, 2009 at 11:19 pm |
thank you for a gorgeous little pattern. I wish to make something little for the fire victims(children). These are excellent
March 31, 2009 at 5:23 pm |
Hello!
Very Interesting post! Thank you for such interesting resource!
PS: Sorry for my bad english, I’v just started to learn this language 😉
See you!
Your, Raiul Baztepo
April 15, 2009 at 10:42 pm |
Thanks for the great tutorial. I’ve blogged about it and uploaded my pictures to the flikr group.
Thanks :o)
Dotty xx
April 15, 2009 at 11:56 pm |
[…] tutorial is here, and I would really recommend checking out all of Little House By the Sea’s blog, because […]
April 16, 2009 at 6:06 am |
Hi !!
I like so much this houses… Thanks for sharing with us !
Kisses from Brazil
Helena
April 30, 2009 at 4:23 am |
[…] patrones los encontre aqui Categorias Seleccionar categoría Amigurumi Craft Crochet Embrodery Felt Free Patern Knit […]
May 21, 2009 at 10:38 am |
Outstanding page=) i will come back soon.
May 28, 2009 at 12:01 am |
I loved this so much, I added it to my May Day Giveaway and linked to this tutorial. I added beads for the flowers. Thank you so much. It was very fun to make and whipped up pretty quickly! I’ll add a pic to the flickr pool.
May 31, 2009 at 9:19 am |
gorgeous… adorable
June 3, 2009 at 3:32 pm |
Too cute for words! How have I missed this tutorial?!
June 27, 2009 at 12:17 pm |
[…] Instructables Child’s Tent, Boutique Nutmeg Designs for Sew, Mama, Sew Kimono Wrap*, Habitual Toadstool Cottage & Mushroom House*, The Little House by the Sea Growth Chart, Unraveled Five Stones: Japanese Bean Bags, Honey & […]
July 7, 2009 at 12:19 pm |
Perfect!
July 7, 2009 at 2:06 pm |
Perfect!! EXACTLY what I was looking for! I want to make larger ones for my nursery decor! (And a small one for my pincushion collection, too!) 🙂
July 22, 2009 at 5:56 am |
Hi!! I just want to tell you that I found your blog yesterday and made the mushroom, now I have to make the toadstool cottage. I’m in love with your work. Thank you so much for the tutorial!!! I will add a pic on the flickr group, you can visit my blog or see it on my flickr too.
A big hug from Argentina!!!
July 31, 2009 at 12:57 am |
Just want to tell you that I have just made a mushroom and am working on a dozen more to give in my advent swaps this year! Thank you sooo much for your generosity in sharing your amazing pattern!
Hugs Paula
PS. I’ve been stitching them while sitting in hospital to beat the bordom 🙂
July 31, 2009 at 2:10 pm |
hai ,tq for this tutorial i take it and post to my blog…
August 2, 2009 at 12:47 am |
[…] Toadstool Cottage & Mushroom House: Free Pattern & Tutorial […]
August 7, 2009 at 6:13 pm |
Thanks so much for this tut….I love these! I’ve just made my first one and am starting on a second. Lovely!
August 7, 2009 at 10:19 pm |
I have recently put up some pictures of my effort at your gorgeous mushrooms. http://www.sewlittlefabric.blogspot.com I have also put up some free patterns. I have gotten so much from the blogging world, it’s time to pay it back.
August 11, 2009 at 9:38 pm |
Paula, wow, I love your blog!
I just made a mushroom to go with the toadstool and put some pics on my flickr http://www.flickr.com/photos/sampler1000/
Will definitely be making more of these cuties. Thanks so much for sharing!
September 2, 2009 at 10:30 pm |
This site rocks!
September 3, 2009 at 8:37 am |
[…] Little House by the Sea blog has a painfully sweet Toadstool Cottage and Mushroom House pincushion pattern and tutorial up. Check out the detail on the embroidery around the door and […]
September 3, 2009 at 12:37 pm |
Oh, I love this! I didn’t have to have one of these until I saw yours!! Thank you so much for sharing.
September 3, 2009 at 6:34 pm |
absolutely fantastic.
i really love these!!
i set a link. i hope you’ll agree.
if not, please leave a short comment.
thanks.
doro.
September 3, 2009 at 9:50 pm |
Thank you very much.
this is so nice and cute
i will surely make this
September 6, 2009 at 3:00 pm |
Very excellent tutorial. Detailed and graphic. Thanks for sharing !
September 8, 2009 at 2:39 am |
I just made one for my dd and I love it! I’m going to make another for my older dd and then another for a friend, and then another for me, and then another and another and another! Thanks so much for sharing this tute with the world! 😀
September 9, 2009 at 2:36 pm |
this is awsome my 3 yrold grandbaby loved doing this we made one for moma, one for mamaw g g, and one for grandma bird. thanks i was cool and lots of fun!!!!!!!!!!!!!!!!!
September 19, 2009 at 4:58 pm |
I wish I’d found this sooner! I just entered a pincushion in a swap. This would have been sooooo cute! Thanks for generously sharing the pattern and directions with us.
September 25, 2009 at 4:34 am |
beautifull
lindo!
xoxo
September 25, 2009 at 4:41 am |
lindo!
October 26, 2009 at 3:59 am |
Hiya,
Have used your patterns for a number of variations and will send pics to the site one of these days. Really inspirational and given many hours of creative pleasure.
However, came across a pic of a pincushion on sale at notonthehighstreet.com and feel sure they have used your pattern. Bit naughty !
Anyway, thought I would let you know. Check it out.
Many thanks
Lizzie Lowe
October 27, 2009 at 5:51 am |
Wonderful! Great pattern. Great instructions. Great photos.
Thank you.
KT
December 4, 2009 at 10:46 pm |
so wonderful, many many thanks;o)
December 21, 2009 at 1:45 pm |
Thank you for this great tutorial and pattern!Instead a pin cushion i made a toadstool cottage to my daughter´s dolls.I love it as it turned out.Many thanks!
January 18, 2010 at 7:14 am |
These are definitely the cutest little mushrooms I`ve ever seen. I will have to convince somebody to make one or two for me. Come to visit for a latte…. Hugs Myriam
January 28, 2010 at 7:58 am |
Thank you so much this pattern was just what I needed for my craft project. Once I have posted it to my blog I will let you know.
February 1, 2010 at 7:51 am |
Thanks so much for the tute and pattern! I’m going to try this.
Smiles-
Melissa
February 3, 2010 at 9:50 am |
What a fun project! I love it so much that I have to make it for the group of girls that I work with at my church. They are 8 to 9 year old girls and I think they would love to make one. Thank you so much for sharing your knowledge so the rest of us can enjoy having them also! Donna
February 7, 2010 at 8:42 pm |
These are fabulous, thank you for sharing them with us.
February 7, 2010 at 10:41 pm |
Gorgeous! Been after a new pin cushion for a while now…you may just gave answered my pin cushion prayers 🙂
February 8, 2010 at 8:25 am |
Thank you so much for this tutorial! I’ve make a link in my blog – hope it’s o.k.!
February 20, 2010 at 5:39 am |
Thank you for the tutorial and pattern. I am always on the look out for things to make from felt for my class of 4-5 year olds. i made a pair of elf shoes to go with the story of the elves and the shoe maker. The little toadstool house will promote story telling and imaginative play. I am looking for ideas for a dinosaur hatching from an egg. Any ideas?
Thanks Victoria
February 21, 2010 at 2:30 am |
[…] is a great tutorial for making these adorable little mushroom houses here. I know a few of us have made them before for a […]
March 5, 2010 at 3:54 pm |
[…] of … others. I made the {above} mushroom, but I got the idea/template/instructions for it here. I like the blogger’s mushrooms better, but this was my trial run. I’ll elaborate on […]
March 17, 2010 at 6:34 am |
Hi
I’m trying to make the mushroom house, and maybe i’m retarded or something but I don’t understand how to attach the cap top to the cap bottom and what the pointy things are for… if you could explain I’d be grateful =)
Thanks
March 17, 2010 at 10:12 am |
The notches (pointy things) are simply there to indicate which side is the bottom. You can snip them off once you’ve sewn the cap top together. Then just match up the edges of the cap top and the base and away you go.
March 19, 2010 at 8:57 pm |
Thank you but I’m still totally lost here… I’ve followed your instructions on how to make the cap top and now that I want to attach it to the cap bottom, I can’t figure how to do it AT ALL. First, the cap looks a lot bigger than the base (though I did cut cap base 2 and cap top 2).
Also I’m a total beginner and I’m afraid I don’t understand your instructions (maybe I’m stupid because everybody else seems to think it’s easy):
“turn the cap inside out again, and baste the cap bottom to the edge. Sew using as small a seam allowance as possible. Turn the cap right side out again, taking care not to stretch the cap bottom”
HOW do I do that? if I turn my cap inside out, it’s not flat like on your drawing at all, it’s… well like a cap, a dome. And even if I do figure a way to sew it to the base, how do I turn it right side out again once it’s stiched???
I’m sorry if I sound stupid but I’m really confused =(
March 19, 2010 at 9:38 pm
The circumference of the cap top and of the base should be exactly the same if you used a 1/4 inch seam allowance – if they’re not the same, it doesn’t matter too much, it just means you’ll have to gather some of the ease. If you are having trouble matching them up, then I recommend folding the base into quarters and marking each fold – you will then have marks at 12 o’clock, 3 o’clock, 6 o’clock and 9 o’clock. Match these marks up to each of the seams on the cap top, and baste in place. Then match up each of the edges between these marks, gathering any excess as you go. Once you are happy with how it looks, sew the seam. To turn the cap right side out again, pull the red part through the hole in the middle of the base, but take care not to stretch the hole as you do it.
I hope this makes a bit more sense. Good luck.
March 19, 2010 at 10:49 pm |
Thank you so much… but I’m afraid I’m still totally lost here. I think I’m going to give up. It makes me sad and it is frustrating and it makes me feel like I’m the most retarded person in the world… =(
I think I’m so retarded I actually need to watch someone do it to be able to do it myself. Besides I’m french and I don’t even know what an inch is (we use centimeters)…
Nevermind, thank you anyway.
March 25, 2010 at 10:57 am |
These are just too cute, saw one on another blog and was linked here!!
(lyn)
April 3, 2010 at 2:27 pm |
Thank you so much for this amazing pattern and tutorial! It’s been a very long time since I did any embroidery(gotta love youtube demo videos). I sent my mushroom out as part of a Worldwide Pincushion Swap. I posted about it here along with a photo http://mintjewels.blogspot.com/2010/04/worldwide-pincushion-swap.html. Have a great long weekend!
April 12, 2010 at 10:55 am |
[…] Pincushions from the little house by the sea. She provides a tutorial and pattern. There are also some great versions on Flickr for embroidery […]
April 26, 2010 at 11:31 am |
Thank u so very much for the lovely pattern and tuto. I will love to make them for my kids’ room !!
April 28, 2010 at 7:28 pm |
What a talented lady you are. Really marvellous work.
May 8, 2010 at 3:00 am |
Thanks for the template! I love this mushrooms!!
May 24, 2010 at 1:14 pm |
These are crazy-amazing. Can’t wait to make some for my kids!!! I just designed a knitted toadstool before I even looked online…now I’m searching for what others have done, and came across THIS. I am so going to make these this week!!
June 7, 2010 at 2:30 am |
Your amanita muscaria mushroom house is adorable! Thanks so much for sharing your pattern. I’m working on one right now and will send you a pic once it’s finished.
June 8, 2010 at 10:06 pm |
Hi, they are great!!! I’ve made one, and put a link to your site!! Thank you for sharing!!
June 17, 2010 at 9:21 am |
Hi,
I´m Christine from Germany and looking around in different blogs and just found your mushrooms…… they are absolutely wonderfull!!!!!
June 18, 2010 at 1:29 am |
[…] -Il blog con il tutorial: https://thelittlehousebythesea.wordpress.com/ […]
July 16, 2010 at 6:19 am |
[…] Toadstool Cottage (left) and Mushroom House (right) Now, I know that craft blogs are full of mushroom pincushions, but when I decided I had to have a mushroom pincushion of my very own, I couldn't find a pattern or tutorial for the shapes I had in mind. Not that the ones I found weren't lovely, just that I had a very specific image in my head of how I wanted my pincushions to look. Failing to find a pattern on the internet, I again had to resort … Read More […]
July 18, 2010 at 5:45 am |
I shared this mushrooms with my friend.
http://mayri-hayriyeninrenkleri.blogspot.com/2010/07/kece-mantar.html
Have a nice Sunday
Thanks.
<:))
August 7, 2010 at 8:13 am |
thank you for sharing this little pincushion. I am hoping to make it to add as a gift in a mini quilt swap that I am involved with, hope my partner likes it as much as I do.
August 12, 2010 at 12:35 am |
So adorable! Thanks for the tutorial!
September 2, 2010 at 9:09 am |
Grazie!
September 16, 2010 at 3:08 pm |
These are precious! As a fairly new quilter (but lifelong sew-er!), I’ve started collecting pincushions & I will LOVE making the Toadstool Cottage to add to my happy collection!
THANKS!!
September 19, 2010 at 2:07 pm |
Thank you for the pattern! I blew it up 300% and modified it a bit to make a Mario 1-UP mushroom/purse for Halloween (I’m going as Princess Daisy). Obviously it wouldn’t translate quite right all blown up like that so I did have to edit as I went along, but it turned out pretty cute!
To make it into a purse, I made the top mushroom cap part and the stem separate, and put sort of an inside-out stem into the top of the mushroom. Then I sewed the actual closed-up stem (Just put another circle of fabric onto the top of it so it was just sort of a conical cylinder) onto the mushroom cap a few inches and put Velcro on the front of the mushroom so that the stem will stay in place when I carry it around. To make it a Mario mushroom, I sewed two long button eyes on the stem and glued five big white dots on the top. It’s super cute, if I do say so myself. 🙂
November 2, 2010 at 12:41 pm |
[…] available in pattern form, one for a mushroom and one for a toadstool cottage. Check it out here. It was designed and created by A Little house by the […]
November 18, 2010 at 8:59 am |
I am in a group that makes pin cushions for swaps this will be next on my list.Thanks
December 10, 2010 at 10:07 pm |
cute! cute! cute! thank you so much for the pattern.
December 30, 2010 at 12:55 am |
8DD Up to the craft room I go!! Adorable, thank you for the inspiration.
February 12, 2011 at 11:51 pm |
hi there,love the little mushroom…would it be possible if i could buy 3 from you….i have been trying to contact you but i dont know how to track you down.please contact me…..’please please’…
March 17, 2011 at 9:34 am |
[…] (US$19) because we have some of the most beautiful doors here in Christchurch, and the last is a free tutorial for a little mushroom house – definitely a design to withstand any earthquake There’s also this super simple house […]
March 20, 2011 at 7:10 am |
I love mushrooms, thank you for the pattern. When I get time to make this I will post picture.
Thank you again.
March 28, 2011 at 7:29 pm |
Thank you very much, merci beaucoup pour ce tutorial, le modèle is very cute!!
April 16, 2011 at 8:34 am |
[…] way too much red and white felt left over from something else so found a fabulous tutorial online (click here) to make my own toadstools. I was sceptical because I’ve had bad experiences with turning […]
April 16, 2011 at 9:38 am |
Very Cute! Thank you for sharing!
April 20, 2011 at 7:26 am |
hi, these are so cute and they are just what i need to make my lil mushroom plushes. xD
i was wondering, though, how i could alter the pattern to have it look somewhat more like this? http://fc09.deviantart.net/fs22/i/2007/320/3/8/maplestory_shroom_by_starxxlight.jpg (the bigger one)
April 20, 2011 at 2:40 pm |
Love, love, love it!!! Have enjoyed looking at the flicker pictures also.
Thank you for sharing. And for the woman that posted she is having trouble converting inches to cm, all she has to do is go to “google” and request: convert 5″ to cm or whatever the measurement is. I have had success converting centimeters to inches by entering the measurement on google. Maybe this will help others. Thanks again
June 6, 2011 at 12:15 am |
[…] Link: https://thelittlehousebythesea.wordpress.com/2008/11/03/toadstool-cottage-and-mushroom-house-%E2%80%9… […]
June 7, 2011 at 11:10 pm |
Beautiful and inspitational
June 17, 2011 at 10:21 pm |
[…] acorn-dolls. And now I made this acorn-doll-tutorial. For felt toadstools you could look here or here or here. 30.09.10 4 […]
June 26, 2011 at 11:59 pm |
love the toadstools/mushrooms….do you do orders…if so could i order 3..please please please…..xxxxxxxxxxxxxxxxxxxxxxxxxx
August 6, 2011 at 1:27 pm |
[…] Toadstool Cottage and Mushroom House: free pattern and tutorial …Nov 3, 2008 … Toadstool Cottage (left) and Mushroom House (right). Now, I know that craft blogs are full of mushroom pincushions, but when I decided I had … […]
September 9, 2011 at 3:28 pm |
[…] Wie bringt man kleine blaue Wichte dazu, bei uns im Kinderzimmer zu wohnen statt in der lauschigen Natur? Mit einem Einreiseverbot für Gargamel und einer Reihe selbstgefrickelter Schlumpfpilze. Dass Türen und Fenster nur aufgenäht sind, haben sie gottseidank noch nicht gemerkt. Das Tutorial für die schnuckeligen Pilze gibt´s bei ↑the little house by the sea. […]
October 1, 2011 at 2:28 pm |
…
[…]Toadstool Cottage and Mushroom House: free pattern and tutorial « The little house by the sea[…]…
October 2, 2011 at 12:45 am |
[…] thelittlehousebythesea.wordpress.com/2008/11/03/toadstool-cottage-and-mushroom-house-–-free-patter… […]
October 7, 2011 at 9:06 am |
These are so stinking cute. I can’t wait to make these pincushions. Thanks for the tutorial.
http://leandthepea.blogspot.com/
October 16, 2011 at 7:27 am |
[…] tutaj […]
October 18, 2011 at 2:29 am |
Was looking for a pattern for a cup-cake pincushion, but once I saw your mushroom pin-cushion I forgot all about cupcakes and have just printed out your pattern – thank you, thank you, thank you.
October 19, 2011 at 2:04 am |
real estate…
[…]Toadstool Cottage and Mushroom House: free pattern and tutorial « The little house by the sea[…]…
October 21, 2011 at 12:39 pm |
have a look af my mushroom house
November 5, 2011 at 11:47 pm |
Thanks for the great pattern, check out my version if you want here: http://thecraftdesk.blogspot.com/2011/10/mushroom-cottage.html
November 20, 2011 at 6:35 pm |
dario…
[…]Toadstool Cottage and Mushroom House: free pattern and tutorial « The little house by the sea[…]…
December 4, 2011 at 12:59 pm |
[…] Toadstool Cottage and Mushroom House by The Little House by the Sea […]
December 5, 2011 at 5:08 am |
ou
I can’t get your pattern for these very cute pincushions. Could you please check your url for the pattern. I would love to make these for myself and my friend who quilts like crazy.
Terry
December 5, 2011 at 11:28 am
Hi, I just clicked on the link in the blog and the pattern opened for me, so I’m not sure what’s going on. Here’s the full url of the pattern – see if this works: https://thelittlehousebythesea.files.wordpress.com/2009/03/toadstool-cottage-and-mushroom-house-pattern-pieces-revised.pdf
December 5, 2011 at 2:54 pm
Thank you so much that url worked just fine.
December 11, 2011 at 10:06 am |
que original simplemente lindo
December 16, 2011 at 11:58 pm |
This is the first real 3-dimensional item I’ve made. Following your directions it really was quite fun and easy. Thanks for posting this adorable pattern. I want to make ten more!
December 29, 2011 at 3:28 am |
These are so cute and well designed!
I just posted a photo and a link on my blog this morning!
December 30, 2011 at 11:31 am |
I have just made 2 of your lovely mushrooms (i’ll use them to decorate my daughter’s bedroom)
thank you soooo much for sharing this, and for the tuto !
Sylvie
January 19, 2012 at 1:18 am |
uau adorable!! lovely,bjos
January 19, 2012 at 11:23 am |
Thank you they are lovely.
January 27, 2012 at 11:13 am |
[…] Passo a passo da Casinha de cogumelo de feltro com bordados floridos. […]
March 5, 2012 at 1:21 am |
aaaaaw this is soooo cute and lovely, my fave bulgerian friend will love this as well, i think i will give it a try for her as a gift.
We both love tiny houses and dollhouses so i’m very greatfull about this sharing of you. thank you very very much;-D
March 6, 2012 at 11:33 am |
[…] 80x80cm kostar 2.490kr en 133×195 kostar 6.990kr. Uppskriftin að sveppunum er héðan og eru nákvæmar leiðbeiningar um saumaskapinn þar. Sveppirnir eru síðan límdir með […]
March 9, 2012 at 10:20 am |
Thank you so much!
I’ve made several to give as gifts!
Found cute little single cupcake boxes by wilton to place them in!
March 22, 2012 at 4:58 am |
[…] Toadstool Cottage & Mushroom House Pincushion […]
March 28, 2012 at 9:25 pm |
I Love them. I’ve made one with small changes. You can see my pics on your flickr group. Cheerio from Spain!
May 1, 2012 at 2:53 am |
Hi there, mine turned out a little different but please come visit it at http://theenchantedbutton.blogspot.com.au/
Thankyou for the being able to use your pattern 🙂 I love it!
May 5, 2012 at 6:17 am |
[…] 25. Toadstool Cottage Pin Cushion Tutorial @ The Little House By The Sea […]
May 17, 2012 at 12:50 pm |
I made these, had to modify the base a bit, but they came out great! Thanks so much!!!
June 5, 2012 at 3:33 am |
These are adorable! Found this on Pinterest and had to check out your pattern and tutorial. Great stuff! Thanks so much!
xoxo
Joy
June 23, 2012 at 2:16 am |
[…] the weather heating up, I’m starting to think more of things to do inside. I ran across this Toadstool Cottage tutorial and free pattern on Feeling Stitchy and thought it would be the perfect escape from this weekend’s predicted […]
July 12, 2012 at 1:03 pm |
Many thanks for sharing your brilliant idea!! Ingenious!
August 23, 2012 at 3:02 pm |
Wonderful pattern! They turned out so cute.
Thank you SO much for sharing!
October 13, 2012 at 11:12 pm |
I have to say, I’ve done exactly as you’ve said with the proper 1/4 inch seam allowance, but I have the same problem as Mimi. The mushroom cap IS bigger than the base.
October 13, 2012 at 11:29 pm |
You just have to modify the base a bit. I made mine 2cm bigger in circumference and it worked fine.
Thanks for being generous enough to share this tutorial 🙂
October 17, 2012 at 2:21 pm
How odd: I’ve never had a problem with the size of the base, and I’ve made quite a few of these. I wonder what we’re doing differently? I’m glad you found a way round it in the end.
October 13, 2012 at 11:34 pm |
The only thing I really don’t get is why are there notches on the mushroom cap?
October 17, 2012 at 2:23 pm
The notches are there to differentiate between the bottom edge and the side, as the bottom edge is a slightly different size.
November 19, 2012 at 3:02 am |
I’ts so cute! Love it!
December 2, 2012 at 4:24 pm |
Thanks so much for this cute and easy to follow tutorial. I found you about 4 years ago, started the toadstool and then lost momentum. I had the perfect reason to start it back up again for a friend’s woodland themed baby shower. I just finished the toadstool with no problems. It’s so adorable! Thank you for putting the effort into creating this for all of us!
December 19, 2012 at 2:09 pm |
[…] de cogumelo de feltro com bordados floridos. Clique aqui para ver o passo a […]
March 25, 2013 at 1:26 pm |
This lady is claiming your tutorial for her own here: http://www.red-brolly.com/red-brolly/2012/09/diy-tutorial-felt-fairy-pincushion-project.html
March 26, 2013 at 1:25 pm
Thank you so much for letting me know. 😦 I have contacted the lady; we’ll see what she says.
April 7, 2013 at 12:44 am |
I don’t leave a comment, however after browsing some of the remarks here Toadstool Cottage and Mushroom House: free pattern and tutorial | The little house by the sea. I do have 2 questions for you if you do not mind. Is it only me or do a few of the responses come across like they are written by brain dead individuals? 😛 And, if you are posting at additional online social sites, I’d like to keep up with you.
Could you list of all of your social networking sites like your twitter feed,
Facebook page or linkedin profile?
May 30, 2013 at 7:46 am |
[…] own than buy one, here’s a roundup of some free pin cushion tutorials and patterns: Toadstool Cottage and Mushroom House Bitty Bug Pin Cushion Basket Pin Cushion Tiny Pin Cushion Square Pin Cushion […]
August 31, 2013 at 7:54 pm |
Thank you! this is soooo helpful, my daughter absolutely wanted a Smurf house, I’m not a crafty person but with this “look like easy” tutorial & your pattern I’m definitely giving it a try!
October 8, 2013 at 12:00 pm |
[…] Toadstool Pincushions: https://thelittlehousebythesea.wordpress.com/2008/11/03/toadstool-cottage-and-mushroom-house-%E2%80%9… […]
October 8, 2013 at 12:14 pm |
[…] Toadstool Pincushions: https://thelittlehousebythesea.wordpress.com/2008/11/03/toadstool-cottage-and-mushroom-house-%E2%80%9… […]
October 30, 2013 at 3:44 am |
[…] a blue IKEA toadstool shaped lamp. They are so theraputic to make. I got the pattern from over at The Little House by the Sea […]
November 9, 2013 at 11:35 pm |
that is the cutest thing ever…i am going to attempt these for MIL xmas gift.
December 8, 2013 at 10:34 am |
[…] Toadstool pincushion or […]
February 10, 2014 at 9:24 am |
[…] Fairy Ring Image by knitting iris Pattern here. […]
April 2, 2014 at 7:31 am |
love it!
plz check out my blog…
thoughtsofalondongirl.wordpress.com
May 27, 2014 at 2:57 am |
[…] The Little House by The Sea | Szöveg, fotók: Lévárdi […]
July 12, 2014 at 11:32 pm |
Thank you for sharing this lovely pattern, it is exactly what I was looking for
August 14, 2014 at 2:49 pm |
https://www.etsy.com/uk/shop/Hippywitch?section_id=10904032&ref=shopsection_leftnav_1
Same person?
September 12, 2014 at 5:43 pm
Thanks for the link. That’s not me, no. Looks like someone is selling items made from my pattern. 😦
December 23, 2014 at 3:57 pm |
i like them
January 14, 2015 at 5:40 pm |
I made one!
http://ferngirl.deviantart.com/art/Mushroom-house-506300342
Thank you so much for the pattern~
July 8, 2015 at 7:37 am |
aprende a hacer crochets
Toadstool Cottage and Mushroom House: free pattern and tutorial | The little house by the sea
September 17, 2015 at 4:44 am |
This item is listed on GOOGLE as an added image to their “images for Christmas sewing projects to sell”-when your copyright declares otherwise. Confused? You betcha!
October 8, 2015 at 1:06 am |
Thanks for the tutorial, I’ve used these as part of a play mat I made for my toddler. I’ve linked back to your original post for the pattern, hope that’s ok, Thanks again for sharing x
December 9, 2015 at 7:00 am |
[…] 出典thelittlehousebythesea.wordpress.com […]
February 25, 2016 at 3:12 pm |
[…] I had a couple of loose wooden balls and spools in two different tins so my daughter could sort them, but now she is a little older, this game was a little boring for her. So I thought that I maybe could use them for something different. I ran to buy glue, found some felt and made this little gnomes. You can find these materials at any craft store. I glued them and looked up a website that had inspired me… “Squirrel Acorns” (it includes the tutorial) and started sewing… After I made the gnomes, I had to make them an home! I found the tutorial on this page The Little house by the Sea” […]
April 9, 2016 at 1:10 pm |
I really doubt if hundreds of people all over the world are copying your pattern. thats one bad thing about people and their copyrights, other people have the same ideas too, although that hippywitch is too close to not be copying. They are adorable. https://www.pinterest.com/explore/felt-mushroom/
November 5, 2016 at 8:22 pm |
Your so awesome thanks for the perfect pattern
June 29, 2018 at 2:05 am |
Very beautiful. Love it!
I have included your tutorial in a list of links for felt pincushions on my blog
https://blueraindrops.com/10-diy-felt-pincushions/
Thank you for sharing
November 19, 2018 at 12:21 am |
These are adorable! Thank you! My mother-in-law will love them! Only hope I can make them as well as you did! (<:
January 12, 2021 at 9:31 am |
darsie
Toadstool Cottage and Mushroom House: free pattern and tutorial | The little house by the sea
February 12, 2023 at 3:07 pm |
These are just adorable. Your craftmanship is lovely, and thank you so much for sharing the pattern and instructions. It may be a bit above my skill level but I’m motivated to try.
March 20, 2023 at 10:34 pm |
[…] by https://thelittlehousebythesea.wordpress.com/2008/11/03/toadstool-cottage-and-mushroom-house-%E2%80%… […]